|
| Sunvisor Installation W107 |
![]() |
To order by phone, CALL 805-921-0100 or 800-222-9577
Back to How to Install
Order Here
The following information is supplied as a customer service
guide. No guarantee or warrantee with regard to results of installations
made by this guide is made or implied.
Home/Select another make
or model click here
TOOLS REQUIRED
Phillips Screw Driver
Replacing your sunvisor would require you to re-use your old sunvisor rod. To do that you must first remove your old sunvisor, bracket and all, from the car. Just unscrew the bracket (the piece at the end of the sunvisor rod that is attached to the car) with a Phillips screw driver.
Phase 1: Removing the Sunvisor Rod from the old Sunvisor
- Now that the old sunvisor is removed from the car you can pull out the rod from the sunvisor. But before pulling it out, you must unscrew the first "locking guide" on the sunvisor (see figure below). This screw is the main lock of the rod and must be unscrewed.
- To pull the rod out, the rod must be properly aligned because there are "guides" inside the sunvisor that stop the rod from being accidentally removed (see figure below). The locating tab will prevent the rod from being pulled out (or placed back in) if its not properly aligned.
- To properly align the rod, note where the ball at the end of the rod is pointing. The hook at the end of the the rod MUST be in the same plane as the sunvisor. What that means is that when you lay the entire sunvisor on a table, the hook should be laying down and not pointing up. Look again at the figure to see where the end of the rod should be pointing.
- Now IF the rod is properly aligned, just press on the sunvisor on a flat surface with one hand and pull the rod with your other hand and it will slip right out. It might be tight depending on the condition of your old sunvisor but as long as its aligned you will be able to pull it out.
Special Note: The tightest part when pulling the rod out can be the sunvisor clip especially if the rod is a little rusty. Holding the sunvisor clip while pulling it out should help or just use a WD40 lubricant if the clip is giving you a hard time. Use fine sandpaper on the removed rod if the rod is corroded to smooth it out.
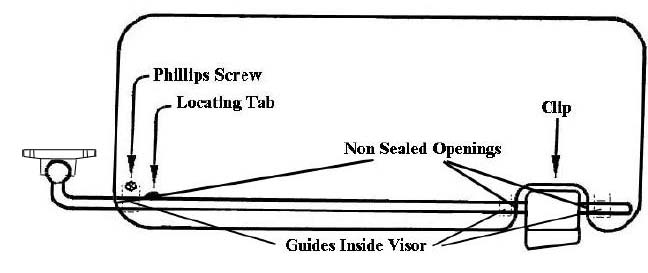
Phase 2: Installing the Sunvisor Rod on to the new Sunvisor
- Again alignment of the rod is the key. The same alignment for removing it is the same for installing it. Hold the new sunvisor on a flat surface and push the rod up to the opening for the sunvisor clip. Do not push it all the way through since you still have to insert the sunvisor clip (again see the figure above).
- It is very important to make sure that the rod went through the "guides". It is possible to miss the guides. Don't miss it! Don't push the rod out of the vinyl opening without going through the guides.
- Once the rod is slightly out of the first vinyl opening, slide the sunvisor clip on the rod. Again this can be tight so using sand paper on the rod before installation to remove rough surfaces always helps.
- Once the clip is in, push the rod into the second vinyl opening until the locator tab has gone past the first "guide". You will know the tab has gone pass the guide when you can freely rotate the rod. Once the tab is past the first guide, screw the guide to keep the rod in place.
Once you have the rod properly installed, then just reattach the sunvisor bracket to the car with a philips screw. Both the left and right sunvisor can be replaced in this manner.
© 3/97 World Upholstery & Trim
05/09/2006
Worlduph.com and XKSS.com are
registered trademarks,
any copying or reproduction
of any kind must be approved by a written contract.
Site maintained by
WorldUpholstery