About Us |  Contact Us |  F.A.Q.s |  Installation
Main Products
by Car Model
ALFA ROMEO
BMW
FERRARI
FIAT
JAGUAR
MERCEDES-BENZ
PORSCHE
SAAB

Color Samples

Other Products
SPRAY DYES
FLOOR MATS
COCO MATS
CONVERTIBLE TOPS
CONVERTIBLE TOP CARE
LEATHER CARE
RAW MATERIALS
GIFT VOUCHERS
website security

Installation Instructions

Some World Upholstery products can be installed by an amateur restorer. No instructions are provided for products that we feel require a professional trimmer.

close [x]

Porsche 911/964 Targa Top Skin « Installation « Home   

Questions? Call (805) 921-0100 or (800) 222-9577, Monday - Friday, 8 am to 5 pm PST. Click to e-mail us anytime!

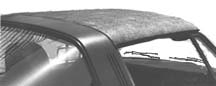
Porsche 911/964 (911 Series) Targa

Porsche 911 Targa Top

Porsche 911/964 Targa Top Skin Installation Instructions
For Product #s: 911-3008

To Order this product by Phone, Call (805) 921-0100 or (800) 222-9577, Monday to Friday, 8 am to 5 pm PST

The following information is supplied as a customer service guide only. World Upholstery & Trim recommends professional installation of all our products. No guarantees are granted with regards to the use of this guide.


Tools required:

  • Phillips & Slotted Screwdriver
  • Scissors
  • Marking Pencil or Chalk
  • Metric Socket Set
  • Awl
  • Spray Adhesive, 1 lb. (#9410)
  • or Brush Adhesive, 1 qt. (#9411)
  • Weatherseal Adhesive, Black (#9412)
  • Silicone Adhesive Black (#9413)
  • Protective Blankets
  • Masking Tape
  • Pliers or Vice Grips
  • Rivet Gun & Rivets
  • Burlap
  • 2" Webbing

Additional parts not included that might be needed:

  • Headliner (#911-4608)
  • Top to Windshield Weatherseal (#911-1709)
  • Top to Door Window Weatherseal (Horizontal) (#911-1716)
  • Top to Targa Bar Weatherseal (#911-1772)
  • Targa Top Latch: 2 pcs maybe required (#911-3001)
  • Targa Top Handle: 2 pcs maybe required (#911-3003)
  • Targa Top Clip: 8 pcs maybe required (#911-3005)

General Preparations:

  1. Inspect contents of box against your invoice, especially color and material.
  2. Protect car with fender covers or blankets to avoid damage to finish.
  3. Remove the targa top from the car and place it upside down on a clean work surface.

Disassembly of Targa Top:

  1. Unscrew the rubber window seals on either side, and then the rain gutters.
  2. Also remove the two metal trim pieces on the frame and in some cases fold back some of the vinyl trim on the frame. It will be obvious if you need to do it.
  3. The clips hold both the skin and the headliner. If you are just replacing the skin then there is no need to remove the clips. Just cut the top skin around them. If you're also replacing the headliner (which we recommend since it's very cheap) then remove the clips along with the skin and headliner.
  4. Pay close attention to how things were originally put together. Save the old skin and headliner so that they can be used as reference later on.

Skip this section if you are just replacing the Targa Skin

Re-building of Targa Top:

  1. The top frame has three aluminum plates that are held together at the front and back ends by a burlap and some webbing. Actually, webbing might be the wrong word. It's simply two pieces of tough material, a few inches wide, that run down both sides of the top, front to back. The burlap is there simply to prevent the vinyl skin from chaffing on the aluminum. The webbing actually runs on the top side. It's not woven between any of the plates.
  2. A small warning - when you have the targa top totally disassembled, and all the plates are unattached, take the top frame to your car, put it on the car, and align the plates on top of the frame - as if the top were attached to the car while driving. Lay the plates in place (this is while the vinyl skin is not on the frame). Then lay the webbing in place along the edges near the windshield frame and the targa bar. Carefully note the position of the front and rear edges of each floating plate in relation to the 2 side plates - which do not float. Then while the webbing is laying in place, as if it were glued and riveted down, use a marker to mark the position of the plates.
  3. After each major step in the Targa Top rebuild process: #1 install webbing, #2 install canvas, and #3 install vinyl - go back to the car each time and make sure the plates are centered between the top edge of the windshield frame, and the top edge of the targa bar. Not centered left to right - this matters too, but less so. What matters is that they are centered from to back. The most important thing is that the gap, maybe 3/8 inch, between the aluminum plate, and each edge (targa bar, windshield) is the same.
  4. Other hints - Drill out the old rivets for the webbing, use the same factory holes. Buy rivet heads for the rivets - these are washers that go over the end of the rivet that gets flattened and get pulled against the opposing rivet head, thus sandwiching the material you are riveting. Also, wrap the nylon material over the edge of the aluminum, and rivet both parts of the same piece of webbing, the top section, and the part wrapped under. Use lots of sealant on the webbing and rivet heads. Allow to dry fully.
  5. When you fold the frame you can now be certain that when it is unfolded everything will be in the right place.
  6. Remove the clips at this point, since they will go over the headliner (for appearance). But...you want to be sure that they can be put back in exactly the same place. Simply hold the clip 'nuts' in place by gluing a piece of foam rubber over them and to the aluminum plates. That's what it looked like had been done at the factory. The reason 'nuts' is in parenthesis is that there is a single 'nut' for both bolts in each clip. Hold them in place with a piece of duct tape.

Replacing the Targa Top Skin:

  1. With the top assembly on the bench and slightly collapsed put the skin in place cut away here and there as needed to fit the frame.. Lightly glue it down along the flap that folds under all around. You're gluing only the flap, and you're gluing it to the underside of the top (the inside of the car side). Start gluing from the center (of the front and back) outwards towards the sides. Pull evenly so the curve of the material follows the curve of the frame. Expand the assembly and test try to the car, if fit is correct, firmly glue in place. Body opening (windshield to targa bar) and targa top dimension should be 30 3/8" in the center, front to rear. Bound edge should just touch to painted surface.
  2. Next the rain gutters and rubber seals go back on.
  3. The headliner is simple. Just put it on, it fits like a glove. Use a little glue to hold it to the top. You'll have to stretch it a bit to get it under the clips, and you'll have to poke holes in it to get the clip bolts through.


www.worlduph.com is a registered trademark.
Any copying or reproduction of any kind must be approved by a written contract.
This website is maintained by World Upholstery & Trim Webmaster


Terminologies:

Over the years, different terminologies have been used for the same parts. To minimize confusion we've collected many of the different names to give customers some reference to the different Alfa Romeo, Mercedes-Benz, BMW, Porsche, Ferrari, Fiat and Jaguar trim parts that vary in terminology around the world.

Convertible top = soft top, rag top, head, hood, hooding, soft window Targa top, retractable top, vinyl top, top boot, convertibles arriba, converteerbare boven
Carpet = rug, rugs, carpet kit, carpet set, molded carpet, cut and bound carpet.
Seating = seat kit, upholstery kit, leather upholstery, sport seat, recaro seat, vinyl seat, cloth seat, sitzkissen, perforated, perforiert, embossed, sitzpolsterung, imbottitura sedile, asiento tapizado
Sealing = rubber seals, weatherstrips, weatherseals, door seals, window seals, gaskets, dichtungsrahmen
Panels = door panels, linings, trimmings, coverings, sun visor, sunvisor, sonnenblenden, headliner, himmel bespannung, encabezando
Trunk = boot

Materials:

Leather = hide, side, skin, cowhide, leder, cuero, Connolly, Roser, Bridge of Weir, cuoio, split
Carpet = Abetone, Dorsett, FTV, feintuft, loop, cut pile, Wilton, perlon, tufted, automatico de alfombras, teppich, tapijt, tapis
Vinyl = Spradling, China General, Freudenberg, MB Tex, ambla, leathercloth, rexine, hardura, ICI, vinyle, naugahyde
Topping = Happich, Stafast, STF, Aresma, Sonnendeck, Sunfast, dobby, lienzo, leinwand
Seat Pad =  rubber fiber pad, foam pad, gummihaarauflage, almohadilla
Sunvisor = sonnenblend, pare soleil, domenica visiera, zonneklep