About Us |  Contact Us |  F.A.Q.s |  Installation
Main Products
by Car Model
ALFA ROMEO
BMW
FERRARI
FIAT
JAGUAR
MERCEDES-BENZ
PORSCHE
SAAB

Color Samples

Other Products
SPRAY DYES
FLOOR MATS
COCO MATS
CONVERTIBLE TOPS
CONVERTIBLE TOP CARE
LEATHER CARE
RAW MATERIALS
GIFT VOUCHERS
website security

Installation Instructions

Some World Upholstery products can be installed by an amateur restorer. No instructions are provided for products that we feel require a professional trimmer.

close [x]

Jaguar XK120/140/150 Seat Upholstery « Installation « Home   

Questions? Call (805) 921-0100 or (800) 222-9577, Monday - Friday, 8 am to 5 pm PST. Click to e-mail us anytime!

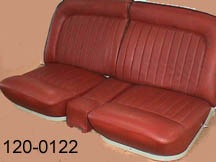
Jaguar XK120, XK140, XK150

Jaguar XK120 Seat

Jaguar XK120/140/150 Seat Covers Installation Instructions
For Product #: 120-0122

To Order this product by Phone, Call (805) 921-0100 or (800) 222-9577, Monday to Friday, 8 am to 5 pm PST

The following information is supplied as a customer service guide only. World Upholstery & Trim recommends professional installation of all our products. No guarantees are granted with regards to the use of this guide.


Tools required:

  • Slotted Screwdriver
  • Staple Remover
  • Standard Wrenches
  • Awl or Punch
  • Tack Hammer or Stapler
  • Sharp Knife
  • Foam Padding

Jaguar seats from the late forties to the early sixties were partially made of wood. Formed angle iron and a few simple brackets made up the entire assembly. All seats in that period were hand trimmed and one man was responsible for the whole install operation.

Most XK120/XK140/XK150 seats as of today will have been re-trimmed and no longer original. It is imperative that all of the old upholstery and foam padding be removed to assess the integrity of the wood structure inside.


Disassembly of Seat:

  1. Begin by removing the seats from the car. The original screws were slotted/countersunk 1/4 inch American fine (28) thread. depending on the model, they were from 1 1/4 to 2 inches long. They can be very difficult to remove. You may need heat.
  2. With the squab or cushion removed from the seat assembly, remove the 2 chrome shoulder bolts and spacer washers holding the backrest to the frame.
  3. Next remove the staples or tacks securing the cushion cover to its frame. Mark the location of each of the pleats on the backrest plywood panel to ease in reinstallation. Remove the cover noting the listings attaching the center seam to the frame. Inspect the metal pan and wood frame for rust or rot. Replace as necessary.
  4. Remove the end and rear vinyl covered casings from the backrest next. Note the 8 #4 chrome slotted wood screws and cup washers holding on the side casing. The rear upper casing is secured by 12 small tacks or brads.
  5. Remove the back panel moquette next. Note the blind tack line on the outer edge of the backrest. This is where you will begin when re-installing the back panel.
  6. With the edges of the leather backrest cover now exposed begin removing all of the staples or tacks securing it. With the edges free from the wooden frame, fold the upper bolster down to expose the padding. Remove same. Next remove the upper foam pad (original was horsehair). and then remove the tacks or staples securing the inner horizontal listing. Attention should be given to the padding removed. Originally layers of cotton batten were hand formed to give the proper curvature to the upper backrest bolster. Remove the cover from the seat.
  7. The main foam pad (originally Dunlopillow) may now be removed. Remove the metal brackets and inspect the wooden components for rot or damage. Replace as necessary.
  8. With the backrest metal brackets removed, now is the time to sandblast and paint or re-chrome the metal components. Early XK120 models had chrome seat frames, later XK120 and all 140 and 150 models had seat frames painted a grey-green color.

Re-assembly of Seat Frame:

  1. With any damaged components replaced, re-plated or painted, now is the time for re-assembly. Glue the wooden blocks to the plywood panels and secure with wood screws.
  2. Secure the metal brackets to the large plywood panel but do not tighten the bolts.
  3. Apply wood glue to the inner end panel block, bolt both the end panels to the metal brackets.
  4. Screw the block on the end panel to the back panel. Bolt the backrest assembly to the lower seat frame with the shoulder bolts correct spacer washers.
  5. With the backrest in place tighten all the securing bolts. Remove the backrest from the frame and install the large backrest pad between the two brackets.

Backrest Cover Installation:

  1. With the backrest frame on its back on the workbench, lay the cover over it in approximately the correct position. Locate the center welting in the "V" of the end panel. Staple so as to have the correct pleat width corresponding to the marks you made when disassembling.
  2. With the cover locked in its first location, temporarily fasten the other end of the center welting to the back of the back panel at its lower edge again using the marks you made on disassembly. If the center welting is not horizontal, move the lower attachment up or down until it is.
  3. Lock the first pleat in position by tacking the listing behind the center pleat to the center panel then locating and stapling each of the pleats along the lower edge of the back panel.
  4. Allow board to dry. Finish the pleated area by stapling the horizontal center listing to the back panel then filling and closing the first pleat to the side of the inner panel. Make sure the welt line is on a flat plane with the lower edge of the pleated panel.
  5. With the pleated area installed, install the upper backrest pads over the stapled center listing. It is necessary to smooth thecurvature of the upper by the addition of cotton wadding or foam padding.
  6. With the shape of the upper pad made, pull the upper listing over the top of the backrest frame and secure to the back of the back panel while maintaining a straight welt line.
  7. The major portion of the installation is complete. Pull the leather bolsters out over the upper listings, smooth any wrinkles and staple to back of back panel.
  8. Beginning at the outer (door) side of the backrest, staple the moquette panel to the back panel face down then fold the material over the staples, stretch it over to the inner panel and staple, pull taut and staple under the upper rear closing panel.
  9. Fold the lower edge under and attach to the lower edge using small headed tacks or brads. Replace the rear and side casings.

Cushion Cover Installation:

  1. With the cover face down on the bench, fill the cover with the pad.
  2. Place the wooden frame assembly on top of the pad and staple the rear of the pleats to the bottom.
  3. Turn the unit over and fold up the skirt to expose the listing.
  4. Using contact adhesive, glue the listings to the pad while pulling the welt into a flat plane around the perimeter.
  5. Fold the leather skirt back down, smooth any wrinkles and staple to the bottom of the wooden frame.

Please highly consider professional installation as these covers are difficult to install!


www.worlduph.com is a registered trademark.
Any copying or reproduction of any kind must be approved by a written contract.
This website is maintained by World Upholstery & Trim Webmaster


Terminologies:

Over the years, different terminologies have been used for the same parts. To minimize confusion we've collected many of the different names to give customers some reference to the different Alfa Romeo, Mercedes-Benz, BMW, Porsche, Ferrari, Fiat and Jaguar trim parts that vary in terminology around the world.

Convertible top = soft top, rag top, head, hood, hooding, soft window Targa top, retractable top, vinyl top, top boot, convertibles arriba, converteerbare boven
Carpet = rug, rugs, carpet kit, carpet set, molded carpet, cut and bound carpet.
Seating = seat kit, upholstery kit, leather upholstery, sport seat, recaro seat, vinyl seat, cloth seat, sitzkissen, perforated, perforiert, embossed, sitzpolsterung, imbottitura sedile, asiento tapizado
Sealing = rubber seals, weatherstrips, weatherseals, door seals, window seals, gaskets, dichtungsrahmen
Panels = door panels, linings, trimmings, coverings, sun visor, sunvisor, sonnenblenden, headliner, himmel bespannung, encabezando
Trunk = boot

Materials:

Leather = hide, side, skin, cowhide, leder, cuero, Connolly, Roser, Bridge of Weir, cuoio, split
Carpet = Abetone, Dorsett, FTV, feintuft, loop, cut pile, Wilton, perlon, tufted, automatico de alfombras, teppich, tapijt, tapis
Vinyl = Spradling, China General, Freudenberg, MB Tex, ambla, leathercloth, rexine, hardura, ICI, vinyle, naugahyde
Topping = Happich, Stafast, STF, Aresma, Sonnendeck, Sunfast, dobby, lienzo, leinwand
Seat Pad =  rubber fiber pad, foam pad, gummihaarauflage, almohadilla
Sunvisor = sonnenblend, pare soleil, domenica visiera, zonneklep